Open topic with navigation
You are here: Home Screen
Home Screen
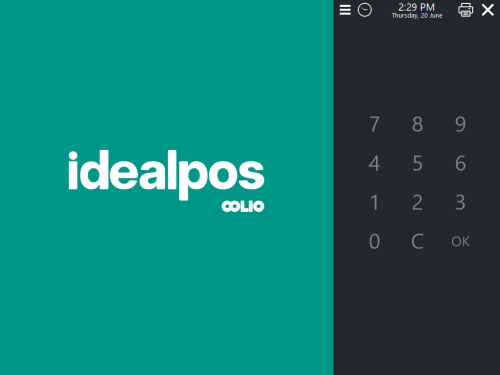
The Home Screen is a screen which can be used by a Clerk to login to the POS screen either by entering their Clerk Login Code or by pressing their Clerk name (or Clerk Image if the Clerk's images have been configured).
Note!
When enabled, the Home Screen will only be used for logging into the POS screen; it cannot be used as the primary method to login to the Back Office.
The login to the Back Office is handled by the standard login screen which is displayed after Idealpos is started - the User will need to enter their Username and Password to login.
In addition to allowing a Clerk to login to the POS Terminal, the Home Screen also enables access to the following functions (see Configuring the Home Screen for further information about configuring Home Screen functionality):
- Blackboard - When the Blackboard is enabled and the menu button is pressed at the top of the Home Screen, the notes entered in the Blackboard will be displayed. These notes can include information for your staff about items that are being sold on special or any other useful notes and reminders.
Any special items or prices that are displayed on the Home Screen will need to be manually updated - Idealpos does not automatically update the prices shown on the Blackboard as the Blackboard is simply a function that can display any custom text, notes or instructions.
- Fast Clerk buttons - When enabled, Fast Clerk buttons are buttons that will appear on the right-hand side of the Home Screen and will show the Clerk's name (or Clerk Images if the Clerk's images have been configured), so that the Clerk can simply click on their name/image to login to the POS Screen.
Refer to the Configuring the Home Screen topic - Step 1 - Fast Clerk Buttons for info on how to assign images to Clerks.
When using Fast Clerk buttons, anyone can simply press the Clerk's name/Image to login as the Clerk.
Therefore, if you choose to enable Fast Clerk buttons, it is recommended that you enable the "Use Employee Log" option and configure a password for the Clerk.
They'll be prompted to enter their Password when logging in.
- Employee Log - The Employee Log button can be accessed by pressing the menu button (≡) located at the top-right of the Home Screen.
When this clock button is pressed, the Employee Log screen is displayed where the Clerk will enter their Clerk Code and Password (if a Password has been configured for their Clerk login).
Employee Log enables the tracking of the times when clerks log on, log off and take breaks.
- Last transaction - The last transaction summary will appear on the bottom-right corner of the Home Screen. The Last Transaction Summary can be expanded to an Expanded Transaction View which will occupy the entire height of the Home Screen, enabling the Clerk to view all the items that were sold in that transaction. The last transaction function can be configured so that it disappears after a timeout, or it can be displayed indefinitely by setting the Last Transaction Timeout value to 0. Note too that the Last Transaction Timeout will apply to both the Last Transaction Summary View as well as the Expanded Transaction View.
- Print Last Receipt button - This button will appear on the top-right corner of the Home Screen. Pressing the Print Last Receipt button will print the receipt for the last transaction.
- Image Slideshow - After a pre-configured timeout, an image slideshow will be displayed.
The Home Screen can be configured to trigger via the following methods:
- Each time the POS Screen is opened/displayed.
- By pressing a Home Screen button on the POS Screen.
- Automatically after a timeout.
- After each transaction is finalised.
When the Home Screen is enabled, it will be displayed on POS terminals and Back-Offices which have the POS module licensed with the Yes/No Option "POS Screen Opens on Startup" enabled.
Therefore, if a user needs to login to a Back Office which is also licensed for the POS module (and the Back Office terminal has the Yes/No Option "POS Screen Opens on Startup" enabled), the user will also require a Clerk Login Code.
If the Yes/No Option "POS Screen Opens on Startup" is disabled and the Back Office is also licensed for the POS module, the user will only require a Clerk Login Code after the POS screen is opened.
FIGURE 1-1: The Idealpos Home Screen.
FIGURE 1-2: The Home Screen after pressing the menu button (≡) towards the top-right of the Home Screen.
FIGURE 1-3: The Home Screen after pressing the menu button (≡) towards the top-right of the Home Screen with the Yes/No Option "Show Blackboard" enabled.
FIGURE 1-4: The Home Screen with the Yes/No Option "Fast Clerk Buttons" enabled (no Clerk Images configured).
FIGURE 1-5: The Home Screen with the Yes/No Option "Fast Clerk Buttons" enabled (Clerk Images are configured).
Clerk Images can be configured by:
Saving the images in the "C:\ProgramData\Idealpos Solutions\Idealpos\Pictures\Clerks" folder.
When creating a Clerk Image, the File Name must be the same as the Clerk Code (image size is 61x61 pixels).
The Clerk Code can be obtained by going to Setup > Clerks and viewing the column labelled "Code" which is shown on the left-hand side of the Clerks window.
FIGURE 1-6: The Home Screen with a Home Screen Graphic configured.
The Home Screen Graphic is configured via Back Office > Setup > Global Options > Other Options > Home Screen > Home Screen Graphic.
Open topic with navigation
